Getting your Computer Ready
System Requirements:
- Microsoft Windows® computer (Windows 10 or 11 with Chrome or Edge Browser)
- Internet Connection: A good internet connection is vital to your online meeting. DepoDash recommends 10 Mbps for both download and upload speeds. Click the Start button to benchmark your internet connection.
Provided by OpenSpeedtest.com
Choose your Audio/Video Device
IMPORTANT! Setting your audio and video/webcam devices is vital to your online meeting.
Enter a Room
- Join a room using the emailed invitation link
- Registered users can also log in and choose to Enter a room.

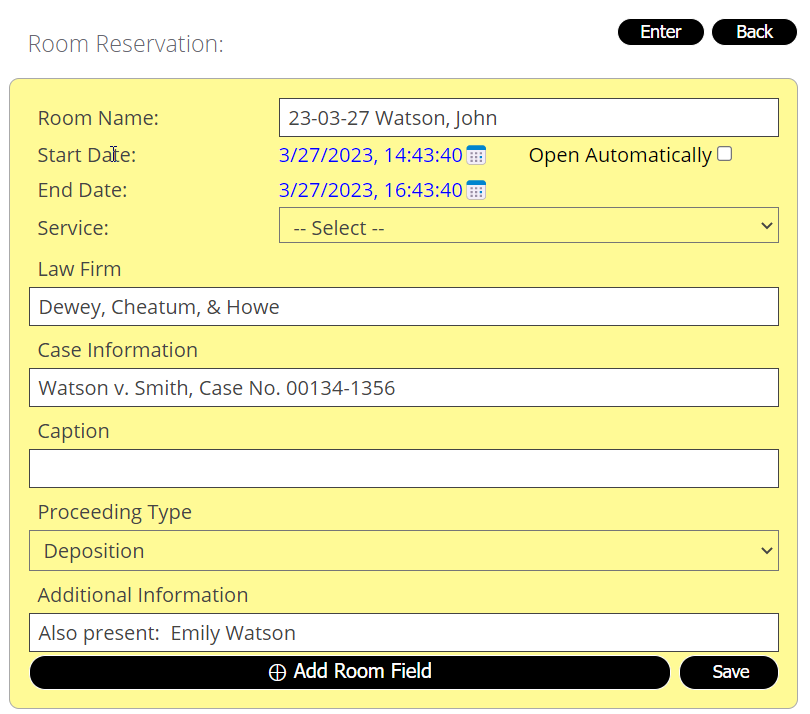
Scheduling a Meeting/Deposition
Quick Meeting Room
Quickly create your room for immediate use or schedule it for the future.
Invite Parties/Attendees
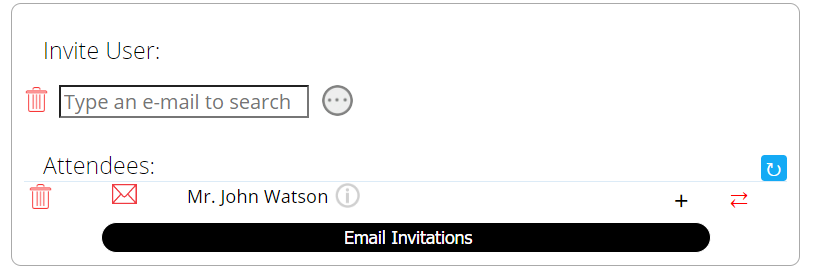
- Type in each attendee’s email address and choose their role, for example, attorney or witness.
- If the attendee is not a registered user yet, click on the plus + symbol and fill out their information.
- If the attendee is a registered user, click the green check mark
- You can modify each attendee’s privileges using the plus “+” symbol.
- Send invitations to individual users by choosing the envelope icon or send an invitation to all users using the “Email Invitations” button.
- Your meeting has now been created.
Managing Your Rooms
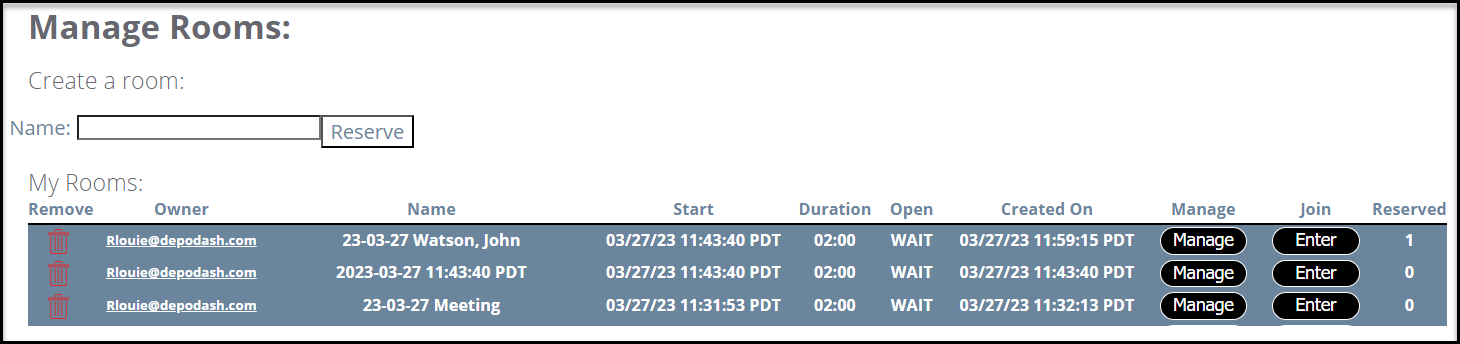
- Registered Users can log in and choose Manage My Rooms to coordinate all meetings and depositions.
- Registered users can delete old rooms, edit or manage the attendees for each room, or enter any current or past rooms that the user has created.
- Current rooms created in the past day are highlighted in gray to help you quickly find your rooms.
Basic Features

Automatic Speech Recognition (ASR)
DepoDash uses its Automatic Speech Recognition (ASR) to record everything that is “On the record.” When the court reporter or host puts the meeting on the record, ASR transcribes the words that are spoken into text in transcript format. Audio and video are recorded when the meeting is on the record.
Change Conference Position
Use the change conference position icon(![]() ) to rearrange the layout of the videos and transcript.
) to rearrange the layout of the videos and transcript.
On the Record Indicators
Green ( ) indicates the conference is connected. Red (
 )indicates conference audio and video are being recorded. The red audio icon will flash when the recording is in progress.
Mute Audio and Turn off Video

You may use the Mute button (displayed above) to mute the audio (microphone) or click the Video button to turn off your camera.
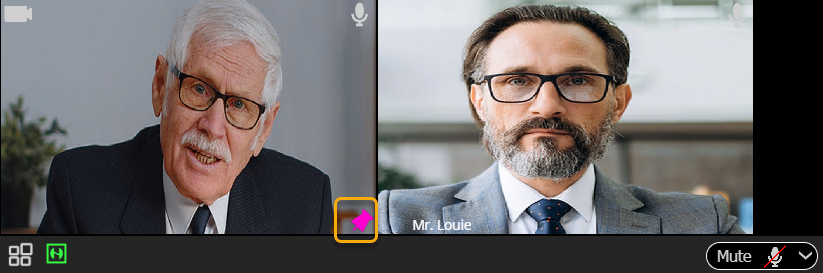
Pin the Witness
In normal operation, the person talking automatically moves to the leftmost, topmost, or middle video position, depending on your layout. You can also “pin the witness” or any other video so that it stays in the number one primary position. This helps you keep focus on any particular participant, for example, the witness or questioning attorney. Choose the pin icon in the lower right corner of the speaking person’s video.
Picture-in-Picture
Use picture-in-picture to move a participant’s video outside of the main conference area. This is useful when exhibits are being shared in order to focus on participants. Picture-in-picture videos can also be moved to a second monitor for optimal viewing.


Share files and Share screen
Use the Share button (![]() ) to Share Exhibits option or the Share Files option to upload and publish exhibits for attendees to review. Share options are based on roles and permissions. As a witness or host, you may not need these permissions.
) to Share Exhibits option or the Share Files option to upload and publish exhibits for attendees to review. Share options are based on roles and permissions. As a witness or host, you may not need these permissions.
Chat
Use the chat icon ( ) to chat with all participants or individuals privately.
Scroll to the End of the Document
The automatic scroll button ( )will appear at the lower right corner of the screen when the user scrolls away from the bottom of the real-time document. Use this icon to resume the automatic scrolling of testimony.
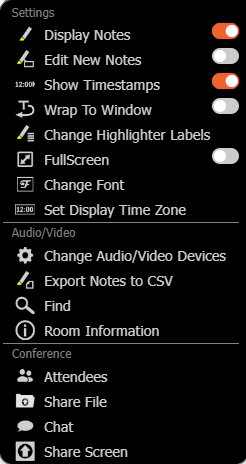
Settings
Use the settings button ( ) for more options and settings. These features are available based on roles and privileges.
Leave or Exit Conference
When finished, use the leave room button ( ) to exit the meeting.
Witness, Deponent, and Observer Features
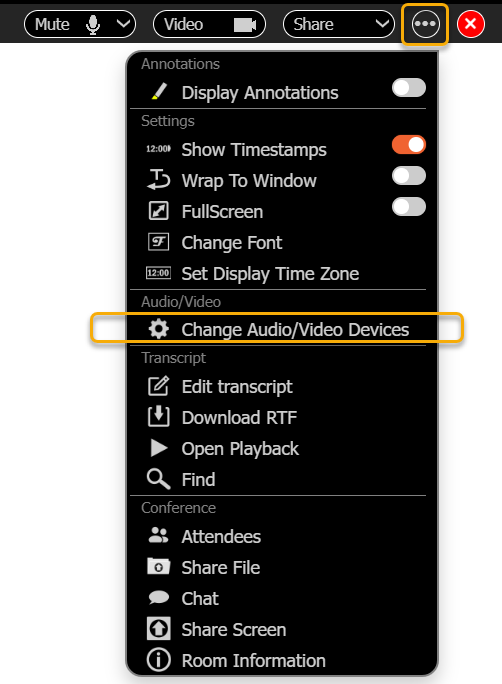
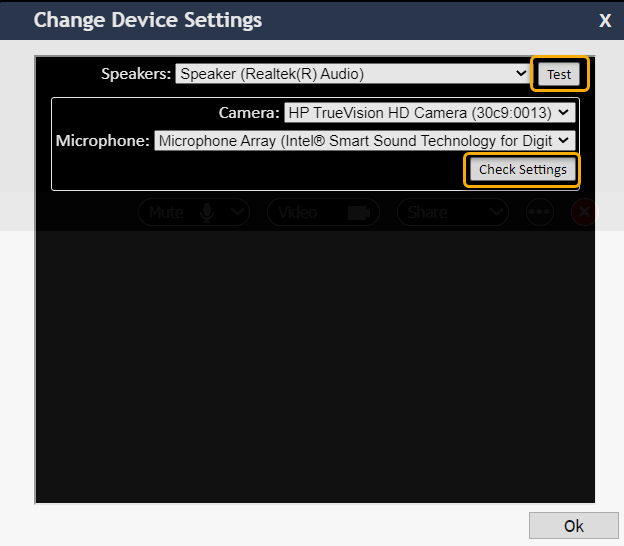
Be sure to choose the right speakers, microphone, and webcam for the meeting. These can be chosen under the Settings button.
Use the Test and Check Settings buttons to test your audio and video.
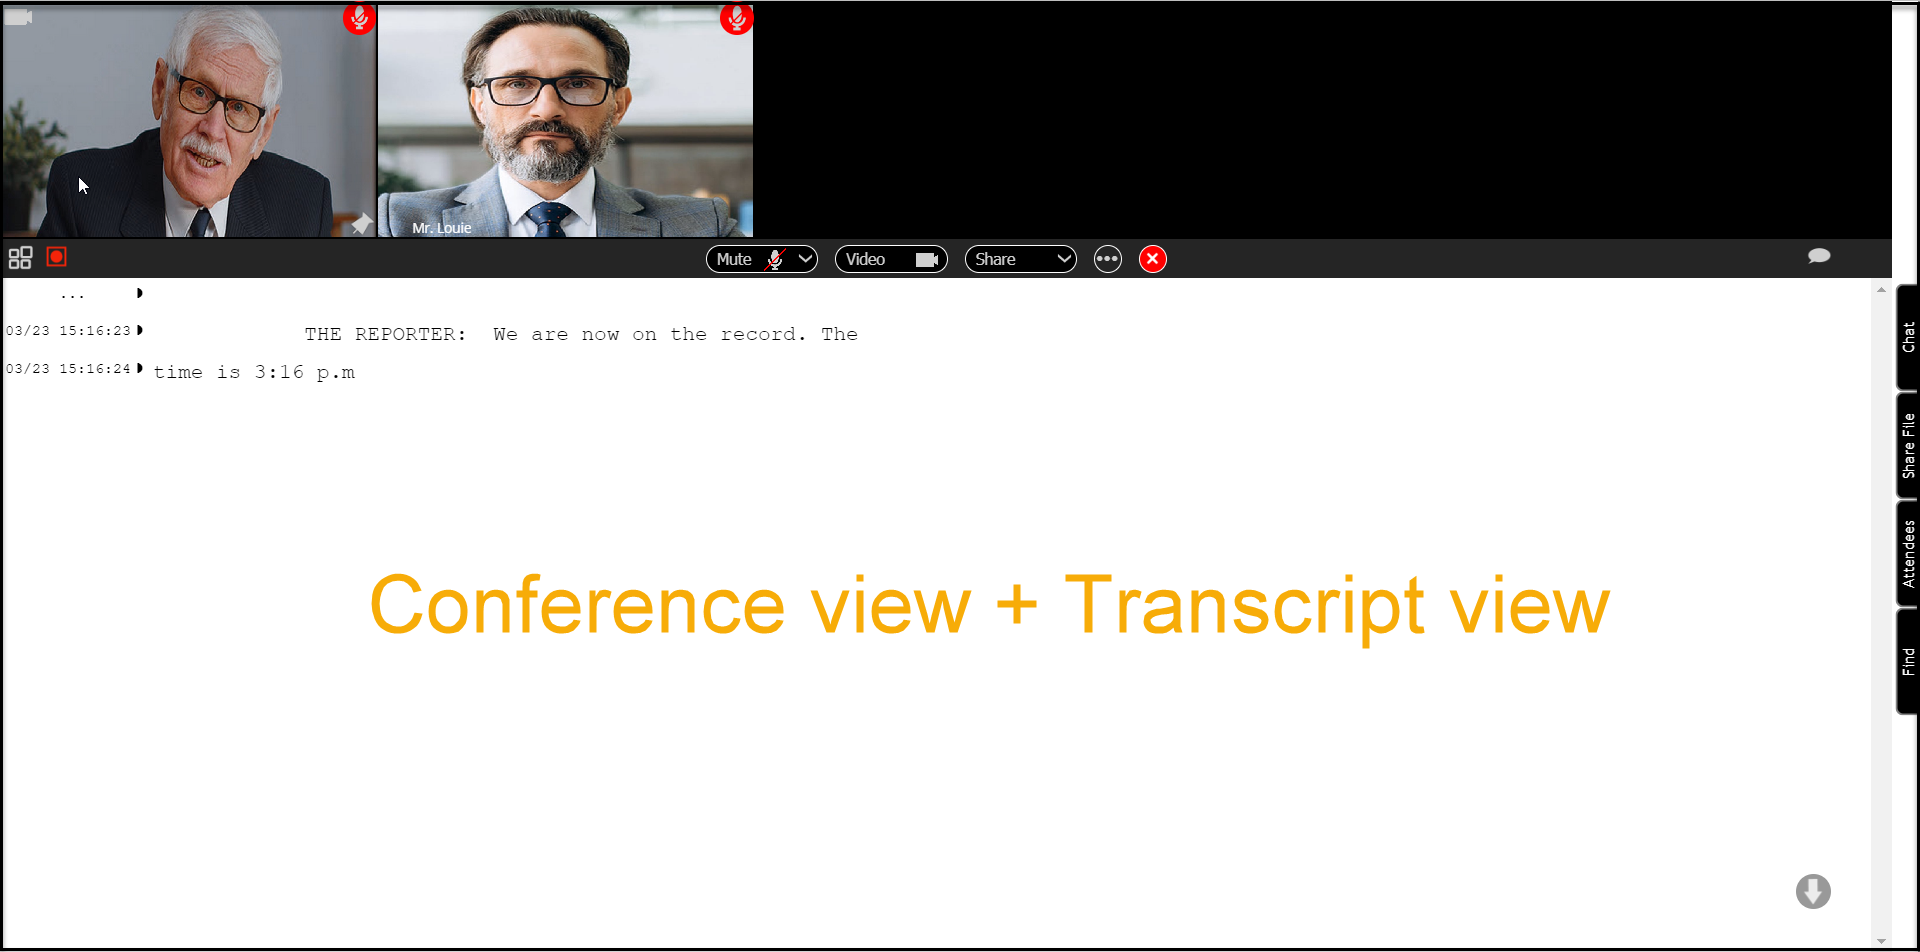
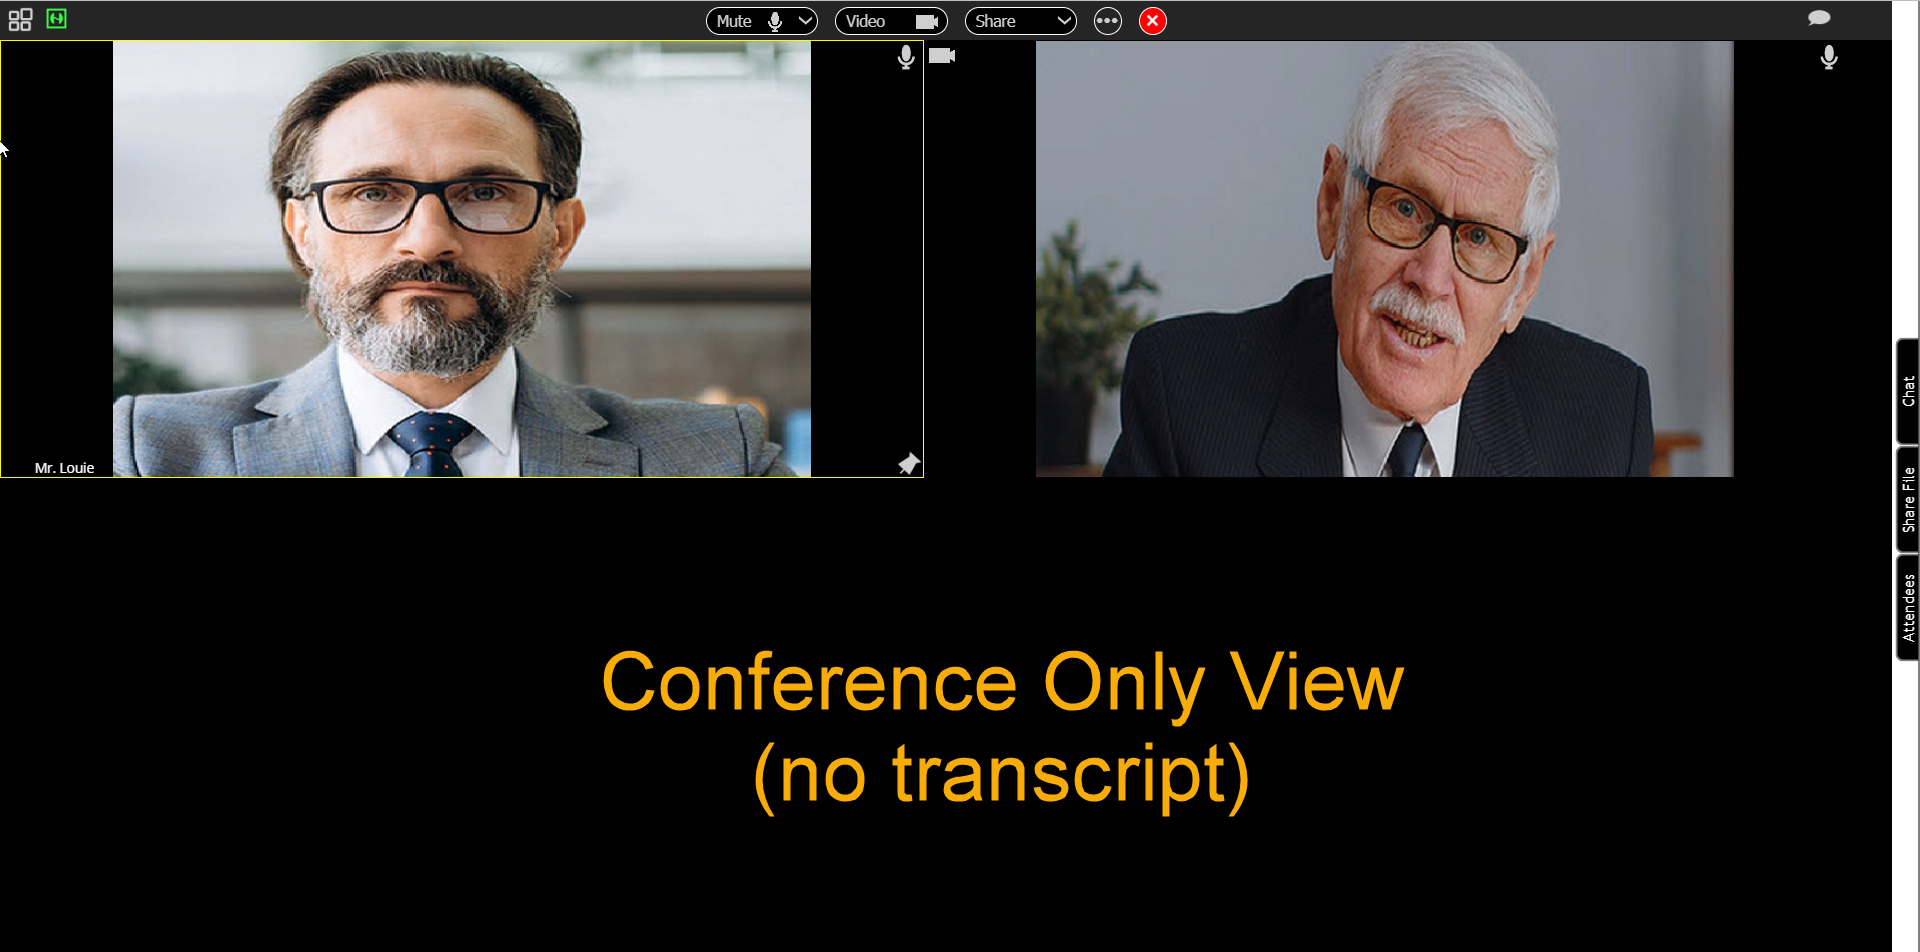
Viewing Options
As a witness, deponent, or observer, you may be shown the conference plus transcript view or the conference only view with no transcript. This permission is determined by the attorneys and the host.
– OR –
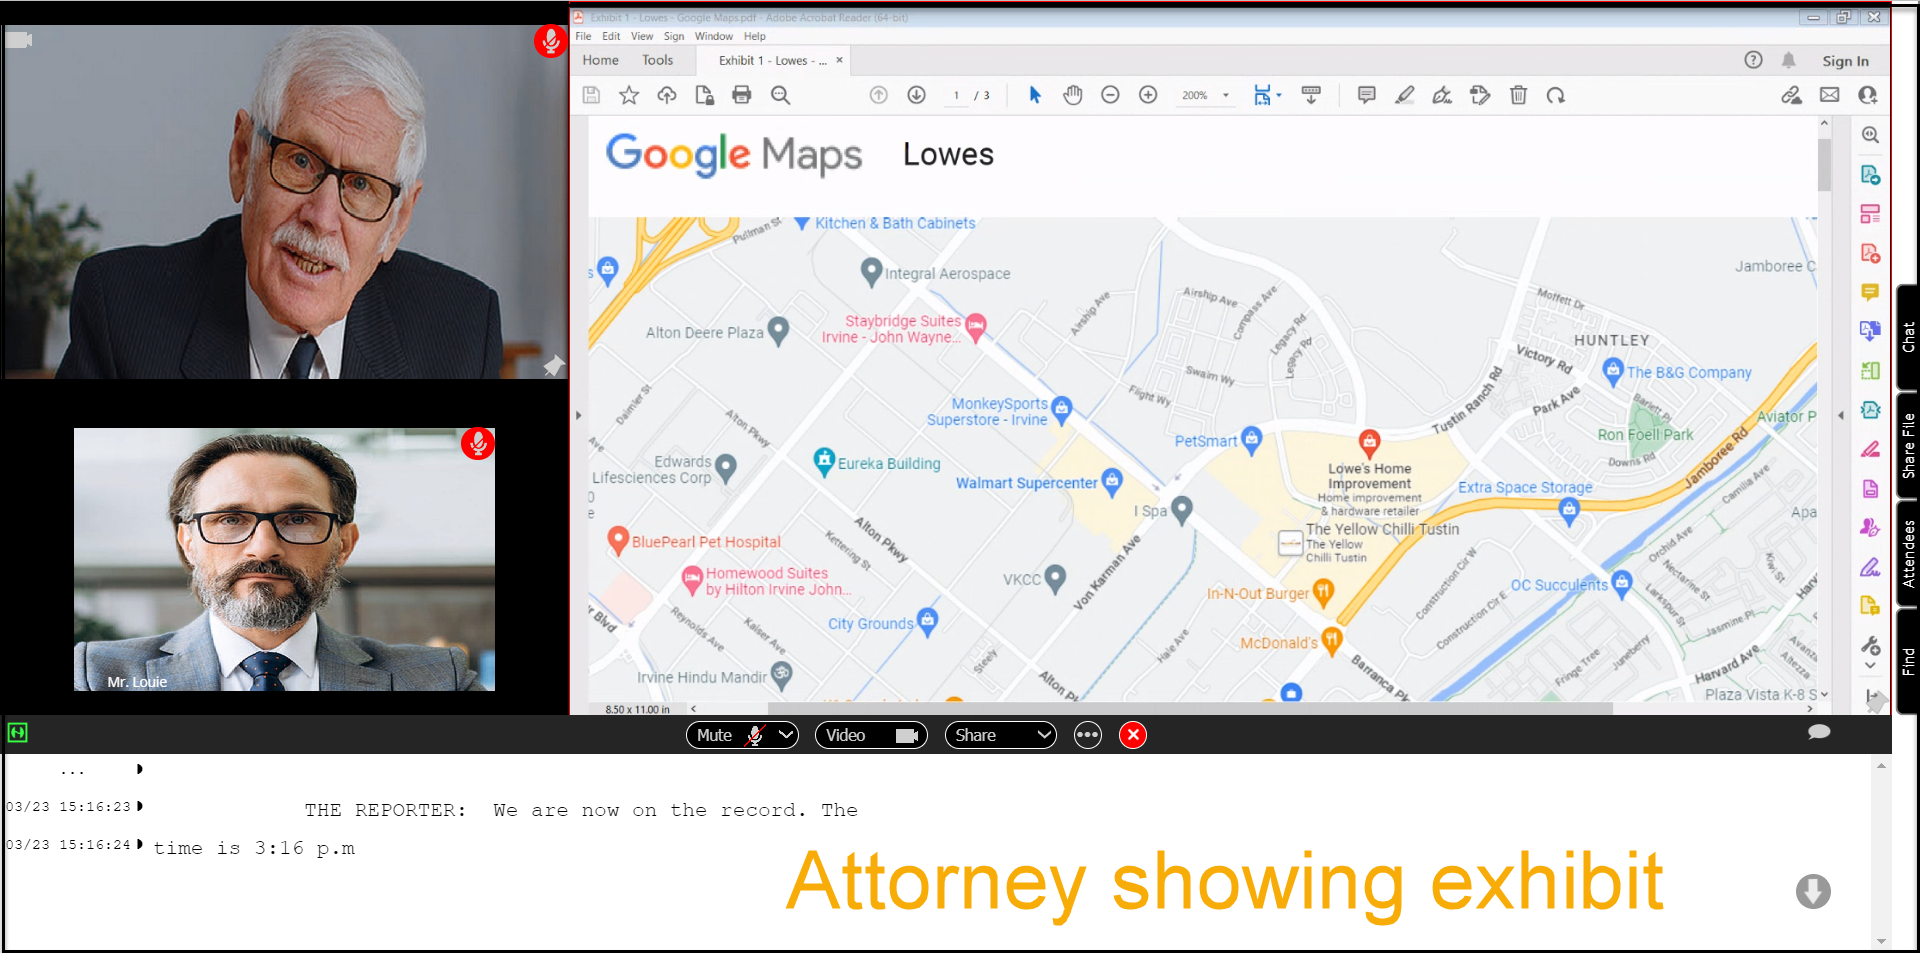
Viewing Exhibits
While in a deposition, attorneys may show or present exhibits. You will see them on your screen along with the videos. As a witness, you do not have to perform any functions but you will be asked questions about the exhibits as they relate to your case .
Sharing Your Screen
As a witness, if you are given sharing permissions, you may be asked to share your own screen. Choose the Share option(![]() ), then the Share screen.
), then the Share screen.
Breakout Rooms
Private, off-the-record meetings can be held with attorneys and clients. The host or reporter will initiate the breakout rooms if and when appropriate.
- The background will become red when you are sent to a breakout room. Breakout rooms are off the record and are never recorded.
- You can leave the breakout room when finished.


Leave or Exit the conference
When the meeting or deposition concludes, use the leave room button () to exit the meeting.
Attorney Features – Part 1
Sharing Your Screen
Use the Share Screen option to share exhibits on your screen. Here are the options to choose from:
- Entire Screen: This is the quickest and easiest method; however, this can lead to you accidentally sharing incorrect or private information since your entire screen is shared.
- Window: Sharing an open window. This is the most common option. Remember, you will need to open the exhibit first before it becomes a shareable item.
- Browser: Allows you to share any open tab on your browser. Use this option if your exhibit is open in a browser tab.
- Example: First, open the exhibit. Choose the Share Screen option. Choose the Window option. Choose the exhibit. Your exhibit is now being shared.
PRO TIP: When using Screen Share to display exhibits, the exhibit may cover your DepoDash viewing screen. use Picture-in-Picture mode to view the witness/deponent. This allows you to see both the exhibit and the witness at the same time. A second monitor to display exhibits is also ideal.

- Use the Stop Sharing button to stop sharing the screen.
Share File
Share file allows attorneys to upload and publish exhibits during the proceedings. Files that are published are downloadable by participants with given permissions.
- Choose the exhibit
- Upload the exhibit
- Publish the exhibit
- The exhibit can now be downloaded on other participant’s screens when they choose the Share File tab.
- You may also unpublish and/or delete the exhibit at any time.
Find
Find or Search allows you to find keywords or phrases throughout the testimony. Clicking on any result will take you to that location in the testimony. This is helpful and ideal for adding annotations.
Request Readback
As in a live deposition, readback is conducted by the host or reporter. Simply ask the court reporter to readback or playback any previous testimony. The reporter will locate the desired area in the transcript and play it back for attendees to hear.
Request Breakout Room
Private, off-the-record meetings can be held with attorneys and clients. Attorneys can simply request a breakout room from the host or reporter.
- The host or reporter will send you and your witness into a private breakout room.
- The background will become red when you are in a breakout room.
- You can leave the breakout room when finished.
Leave or Exit Conference
When the meeting or deposition concludes, use the leave room icon () to exit the meeting.
Attorney Features – Part 2
Attorney Annotations
In real time, attorneys can add annotations to the transcript by either marking keywords using the spacebar or typing in their own comments on-the-fly.
- First, turn on Display Annotations from the Settings button
- You can also Press 0 through 9 on your keyboard to choose a category. The annotation number will be displayed in the upper right corner. This annotation number refers to issue codes explained in the next section.
- Use the spacebar to mark an annotation on-the-fly or click on any word to annotate anywhere in the transcript.
- Annotations can be modified or deleted at any time by re-clicking the annotation. You can also type in your own words for your reference.
- Annotations can always be downloaded by the attorney at any time. Downloading and exporting annotations is explained in the next section.
Attorney Issue Codes
Issue codes is another feature that allows attorneys to easily categorize spots in the transcript that pertain to certain subject matters, objections, or other notations.
- These are completely customizable. Choose the Settings button – Change Highlighter Labels.
- To use issue codes, simply press 0 through 9 on your keyboard. This will change the Issue Code number in the upper right corner. Issue codes are used to categorize each annotation for easy reference.
- For example: You can put issue codes in for “Instructed not to answer” by pressing 2 to change the issue code category and then using the spacebar to mark it.
- Pro Tip: Pressing the spacebar once or clicking on a word marks the words spoken whereas double-clicking or pressing the spacebar twice allows you to type your own notes into the annotation rather than simply marking the words. This allows for extremely fast and efficient note taking.
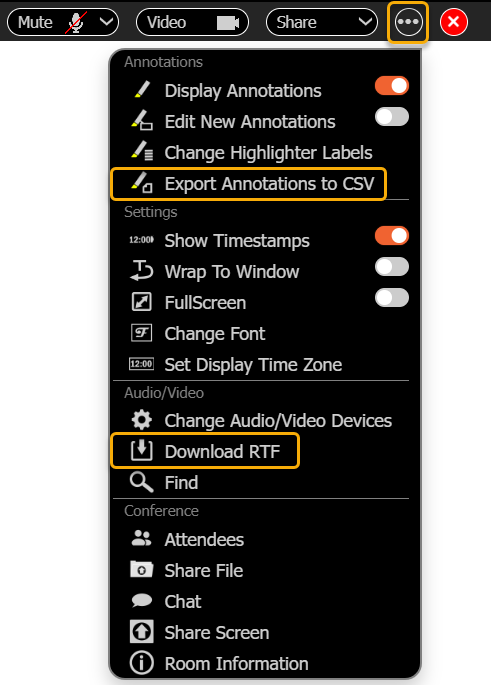
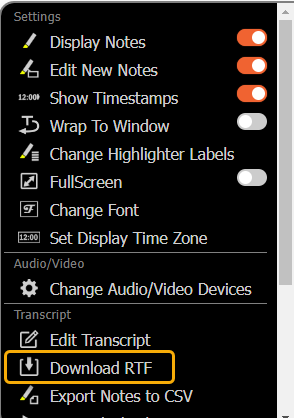
Export Annotations and Rough Drafts
- All annotations and issue codes can be exported to a CSV file anytime for easy reference.
- Rough Drafts can be downloaded when given permission by the host or reporter. Rough drafts are in RTF format, compatible with MS Word, other word processors, and CAT systems.
.
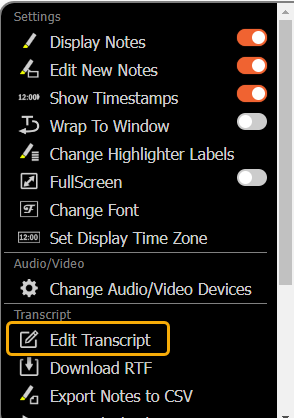
Editor Features
Edit Transcript with Audio
- A separate editor, scopist, or proofreader can edit the transcript in the background with audio and is typically not part of the meeting.
- Open the Editor mode by choosing the Settings button, then choose Edit Transcript.
- Audio can be used at any time to assist with editing.
- Open the Playback mode by choosing Open Playback.
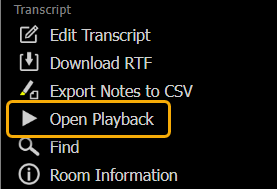
- To play audio, Click on any timestamp and press the Play button in the bottom right corner.
- Click on any other timestamp to play that position in the transcript at any time. Playback is synchronized to the transcript.
- Editing is done paragraph by paragraph. We suggest using CTRL+arrow keys to move around faster. The paragraph you are currently editing will have an orange background.
- Press F1 for a list of more helpful commands.
- Additionally, multiple editors, scopists, or proofreaders can be used, all at the same time.
- When finished editing a paragraph, press CTRL+S to save and refresh all participants’ transcripts.
Reporter or Host Features
Reporter Features – Part 1
On/Off the Record
The reporter can easily put the proceedings on or off the record at any time using this button. On the record means audio and video are being recorded. The red record icon will be flashing during recording. Going off the record turns off the recording.

Mute All or Individuals
When necessary, the reporter can mute any or all participants in order to address the attendees and maintain order in the deposition.

Automatic Speaker Identification
Speakers are automatically identified by DepoDash. With DepoDash’s automatic speaker channel separation, reporters DO NOT have to identify speakers as they talk!
Question/Answer Mode is automatically detected once the attorney starts his or her questioning of the witness or deponent.
Annotations
Court reporters can instantly annotate the transcript in real time on-the-fly with one-touch annotations. Annotations are very fast and easy to do. Remember, no speaker identification is needed!
In real time, reporters can add annotations to the transcript by either marking keywords using the spacebar or typing in their own comments on-the-fly.
- First, turn on Display Annotations from the Settings button
- Use the spacebar to mark an annotation on-the-fly or click on any word to annotate anywhere in the transcript.
- Pro Tip: Reporters should turn on “Edit New Annotations” for faster one-touch annotations. This allows the reporter to type in annotations quickly.
- Annotations can be modified or deleted at any time by re-clicking the annotation. You can also type in your own words for your reference.
- Annotations can be downloaded at any time by going to the Settings button and choosing Export Annotations to CSV.
Instant Include Files
Discussion Off the Record, Exhibit marked, Interruption in the proceedings, Recess taken, or any other blurb chosen by the reporter can be inserted on-the-fly into the transcript.
Choose the Includes tab on the right hand sidebar.
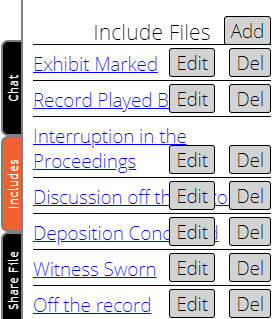
Choose Add, Edit, or Delete to customize.
Reporter Features – Part 2
Readback
Readback (or playing audio back) can be performed at any time while on the record for attendees to hear what was spoken. Simply choose the desired start and end lines and choose “Readback”
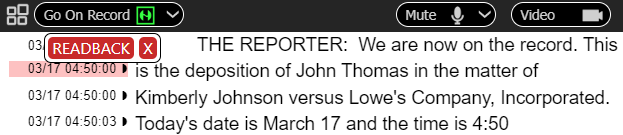
Pro Tip: For efficiency, simply double-click the desired timestamp to read back from. Click STOP to stop the readback.
Edit Transcript with Audio
- Reporters can edit the transcript at any time.
- Open the Editor mode by choosing the Settings button, then choose Edit Transcript.
- Audio can be used at any time to assist with editing.
- Open the Playback mode by choosing Open Playback.
- To play audio, Click on any timestamp and press the Play button in the bottom right corner.
- Click on any other timestamp to play that position in the transcript at any time. Playback is synchronized to the transcript.
- Editing is done paragraph by paragraph. We suggest using CTRL+arrow keys to move around faster. The paragraph you are currently editing will have an orange background.
- Press F1 for a list of more helpful commands.
- Additionally, multiple editors, scopists, or proofreaders can be used, all at the same time.
- When finished editing a paragraph, press CTRL+S to save and refresh all participants’ transcripts.
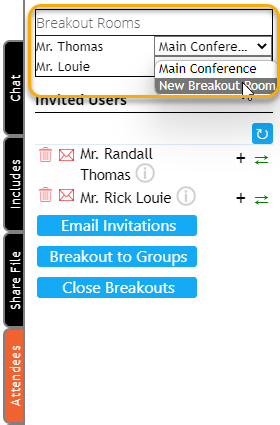
Initiate Breakout Rooms
Reporters/hosts can send attendees to private breakout rooms for off-the-record discussions. When in a breakout room, the background will be in red. Either the host or the attendee can return you to the main room.
Reporter Features – Part 3
Open/Close meeting
The reporter or host can open the meeting at any time, even before the deposition’s scheduled time. This allows time for preparation before the record commences.
![]()
Invite Attendees (coming soon)
Forgot to invite someone? Sent an invitation to the wrong email address? No problem. The host or reporter can simply send an invite during the deposition!
Set Conversation Mode
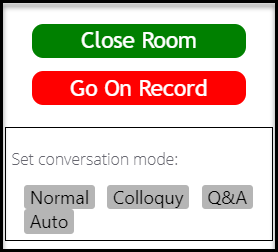
In the Control Panel, reporters or hosts can set the conversation mode:
- Normal – Speakers are not indented, and all speakers are listed with their names.
- Colloquy – Speakers are indented, and THE REPORTER and THE WITNESS terminology is used instead of speaker names.
- Q&A – Forces Q/A mode for attorney/witness
- Auto – This is the recommended default setting. Automatically switches between Colloquy and Q/A mode.
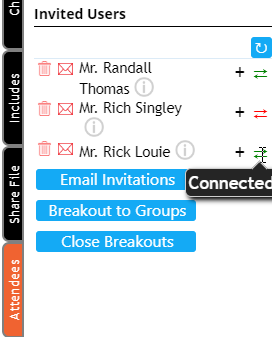
Attendee Status Monitor
Reporters and hosts can use the Attendee Status Monitor to check and verify each attendees’ connection and attendance in the meeting as well as see all who have been invited and control their permissions.
Rough Drafts
- Reporters can export the rough draft in RTF format, compatible with MSWord, other word processors, or any CAT software. Export to CAT software includes synchronized text and audio to allow for easy editing and finalizing of the transcript.
- Reporters/hosts also have instantaneous control of whether attendees can download a rough draft at any time during or after the proceedings. Click on the Attendees tab to access the list of permissions and choose Export.
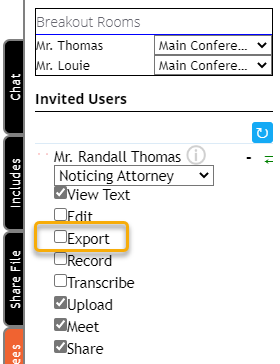
Permission Controls
Reporters/hosts have 100% full control over all attendees’ permissions. Permissions include ability to share screen, upload exhibits, view the transcript, save rough drafts, edit the transcript, and participate in the meeting.
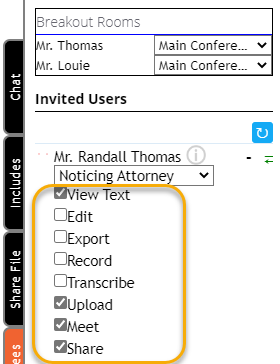
View Text: allows viewer to see the transcription.
Edit: allows viewer to edit the transcript.
Export: allows viewer to download rough draft (RTF)
Record/Transcribe: allows viewer to control on/off the record.
Upload: allows viewer to upload files or exhibits.
Meet: allows viewer to participate in video portion of the meeting.
Share: allows viewer to share screen.
Troubleshooting
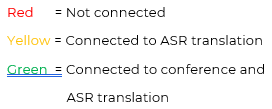
- There are two components to a successful connection. One, the video connection, and two, the ASR connection.
- If one of these components’ connection is lost, the other may still function.
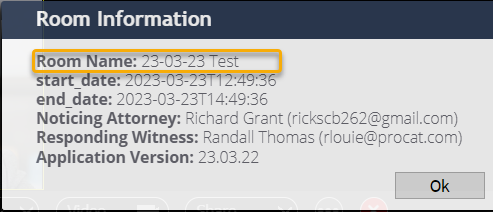
- The host or reporter can check the Attendees’ status by choosing the Attendees tab on the sidebar.
- If the status is red, the participant has not joined the session or has lost internet connection. Confirm that the participant has a good internet connection (10 Mpbs upload and download) and they have joined the correct room.
- The correct room information can be found from the Settings menu – Room Information

- If the status is yellow, the participant is connected to the ASR portion of the meeting but not the videoconference portion. Click the browser refresh button or press F5 to refresh.

- Some computers, Fn+F5 must be pressed.
- If the ASR has stopped but the videoconference portion is working, press the refresh button as stated above.
- If the status is green, the participants are connected for both the ASR and the conference video portions.
- TIP: If there is a problem with the connections, the host or reporter should go “Off the record” until it is resolved.